
Snapshop is a small, lightweight screenshot capture and image manager. It requires no installation and can be run from any location on your computer.

- 1 Introduction
- 2 Download
- 3 The Snapshop Manual
- 3.1 Starting with Snapshop
- 3.2 Hotkeys
- 3.3 Screen Capture Window
- 3.4 Organize Tab
- 3.5 Find and Sort
- 3.6 Find Syntax
- 3.7 Shortcuts
- 3.8 Configure Tab
- 3.9 Advanced Button
- 3.10 FTP Configuration
- 3.11 Folder Configuration
- 3.12 Check Options
- 3.13 Languages
- 3.14 Tagging
- 3.15 Watermarks
- 3.16 Compression and Scaling
- 3.17 Tray Icon
- 4 Development
- 5 Questions & Answers
- 6 Feedback

y primary purpose in writing Snapshop was to create a program that made screenshot capture, sharing, and storage as fast, simple, and efficient as possible. I believe Snapshop meets those goals well. With only one key press and one mouse click you can now capture an area on your screen, compress that capture, automatically generate a unique name, upload the image, and have the image URL copied to the clipboard ready to share with a friend or co-worker.
But Snapshop does more than capture screen images. If you do a lot of design work with your computer, it helps you keep a persistent visual history of your work both on the web and on your hard disk. Snapshop helps you catalog whatever you capture with image tags and searching and sorting functions. You can rename, replace, remove, and batch process new or existing images.
Snapshop is also a quick tool for uploading images online. Just drop your files into Snapshop and it will quickly upload and catalog them.
Go ahead and give Snapshop a try. If you like it, use the feedback feature to leave me a comment or suggestion. If you don't like it, just delete the program from your hard drive. Either way, I thank you for the visit.

Run the program "Snaps" and a camera icon should appear in your system tray.
Click the tray icon with your left mouse button to bring up the Snapshop user interface. In the Configure tab choose where you want to store your captured images. Choices are FTP Site, Clipboard, and Hard Disk.
Save your setting and dismiss the Snapshop user interface by clicking the OK button.
Press  to capture a screen image. Click the screen icon in the capture window to confirm your selection.
Explore the Snapshop user interface to organize your screen captures and change options, or read further to learn more about using Snapshop.
: Initiate a screen capture + : Initiate a screen capture of the current window
 + : Initiate a screen capture and prompt for the image name
 + : Bypass Snapshop and function as normal Print Screen
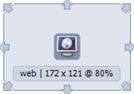
The Snapshop capture window is displayed whenever you press . You can drag the capture window with the mouse to select the screen region you wish to capture. Resize it by clicking and dragging any of the eight grips on its edges. You can also move the window with the arrow keys, or shift the window while holding and using the arrow keys.
The capture window displays the capture destination, capture size, and scaling information when scaling is on. Toggle through web, clipboard, and disk destinations by pressing  ,
 , or
 . Press
 or click the capture button in the middle of the window to create a Snapshop. Clicking outside the window or pressing
 cancels the capture.

The Organize tab lets you view your collection of Snapshop images. Images are added when you capture to the hard disk or an FTP site. You can also add images by dragging files from Explorer into the image collection list. Depending on your save-location setup, dropped images are copied to your Snapshop folder or uploaded to your FTP site. They are then added to the collection and tagged with the word "import".
The collection displays thumbnails together with each image's location, name, size, dimensions, date taken, and user-defined tags. Rename an image or add tags by clicking its name or tags in the list. Separate multiple tag names with commas.
Remove images from your hard disk or FTP site with the red x button. The Copy button places image data or the image URL on the clipboard. Double-clicking an item opens it in your computer's default program.
Type text into the Find field to limit the displayed images to names containing that text or tags beginning with it. Combine alternatives with commas and required terms with the + character. Add ! before a name or tag to invert the result. Use ! by itself to find images with no tags. Start a search with ftp: for FTP images only, or disk: for images stored on disk.
The following keyboard shortcuts can be used within the image collection list.
: Cancel editing a name or tag : Rename an image
 : Edit image tags
 : Refresh the image list +
 : Find an image +
 : Remove an image from your hard disk or FTP site + : Open an image with your computer's default program
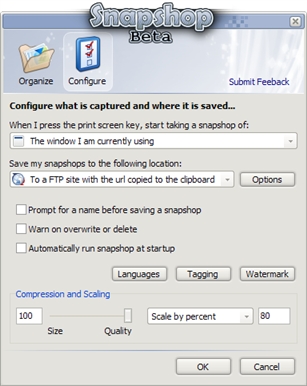
The Configure tab stores options controlling what Snapshop initially captures when you press , where the image is stored, popup dialogs, and image compression.
The "start taking a snapshop" list provides these options:
The "save my snapshops to the following location" list provides these options:
The Advanced button is enabled when FTP Site or Hard Drive is selected as the storage location. For FTP Site it displays connection and upload settings. For Hard Drive it displays a dialog for choosing the Snapshop image folder.
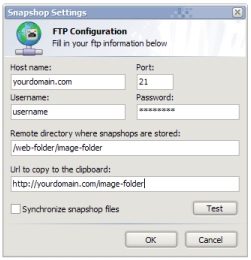
Use the FTP configuration dialog when you want captures stored automatically on an FTP site. It appears when you click Advanced with FTP Site selected or when an FTP upload fails.
Fill in the host, port, username, password, remote directory, and optional URL. When the URL is supplied, you can copy and paste web image links to share them online.
Note: Your password is stored in encrypted form on disk while Snapshop is not running.
Use the Test button to check the connection with the information you supplied.
The Synchronize option pulls .jpg images from your FTP site back into Snapshop. Select it and click OK to begin. Acquired images are placed in the collection and tagged "sync".
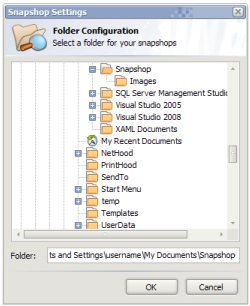
The folder configuration specifies where images are stored when Hard Drive is selected. By default Snapshop uses a folder named "Snapshops" in your Documents folder. Select another folder from the tree or type its name into the Folder field. To create a folder, type its name and click OK.
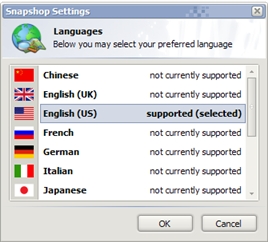
The Languages button opens the dialog used to alter the language displayed by the Snapshop user interface.
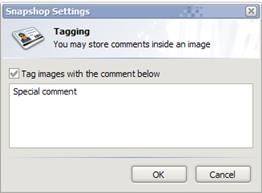
The Tagging button launches the tags editor. Tags are comments attached to the images you create. They are placed inside the image file and can be used by Windows Explorer when searching. Tags can also identify images as yours, making it possible to recognize copies hosted by a third party.
Tag comments are also applied when "Tag images with the comment below" is checked and you capture, upload, or batch-process images by dropping them into the collection.
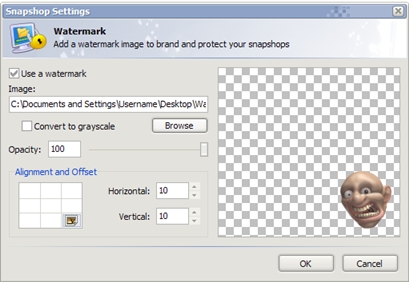
You can add watermarks to images captured or imported with Snapshop. A watermark is an image placed over the image you create, most often to protect images shared online.
Snapshop's watermarking features let you:
Note: Watermarking is applied before scaling, so the watermark is scaled along with the image.
The image compression field and slider control image file size. Lower values make smaller files at reduced quality. Higher values preserve more quality at the cost of larger files. A compression level of 100 produces lossless quality.
The scaling options control whether captured or imported images retain the source size:
When scaling is enabled, image names are appended with the scale size so multiple sizes can be stored.